After a first couple of small Arduino projects I felt the need to make something a bit more useful and permanent.
I had seen Roo Reynolds talking about hacking his doorbell to get it onto Twitter and as our doorbell is a bit rubbish I thought this seemed like a good project. His hack only updated Twitter, so there was no direct physical sign that the doorbell had been rung. Given that our current doorbell is pretty rubbish anyway (it should ring, but just makes a rattling sound), I decided to start off with the physical/audible side of things and then later move on to pushing notifications out to laptops on the local network or beyond...
I've been documenting my progress on Flickr now for a while.
Take apart wireless doorbell
Following Roo's approach, I picked up a cheap wireless doorbell from Tesco for about £9 and took it apart:
I was able to verify that I could turn an LED on/off with the doorbell at this stage, so I knew I could use that as a signal in the Arduino. Using a multimeter also let me figure out some more details about the voltage and current used to power the speaker:
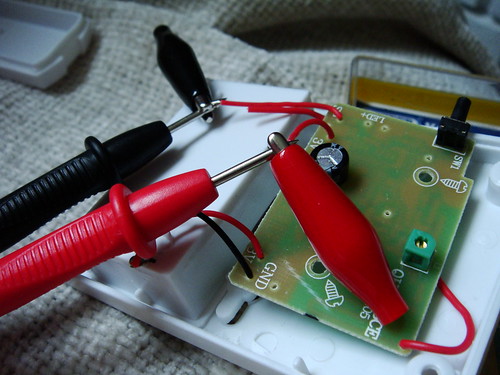
This was about 3.1 V and 75mA output. That's a few milliamps more than the Arduino can tolerate, so I knew I had to make sure I put a resistor (22KOhm) in between the doorbell and the Arduino. The doorbell would also need to draw power from the Arduino, but luckily the Arduino has a separate 3V output, so that wasn't an issue.
From there I verified that when the doorbell was activated I could read a drop in voltage from the wire on the doorbell labelled "SPI". At this point I had the input for my Arduino.
Servos and prototypes
The next step was to provide some sort of audible output. Originally I had thought about just adding a buzzer, but fancied something a bit more old-fashioned. I figured it'd be good fun if the nice 21st century tech of the Arduino used some rather more ancient technology to create sound - a bell.
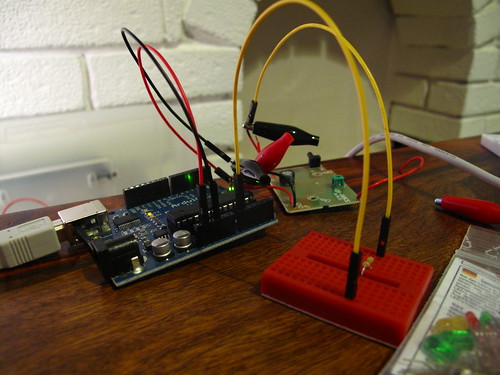
Using a micro servo from Oomlout I created a couple of prototypes.
I made a pretty simple circuit to hook up the servo, doorbell and arduino:

The first prototype used some lego and a bell from a Christmas ornament:
This worked, but the servo was probably louder than the bell!
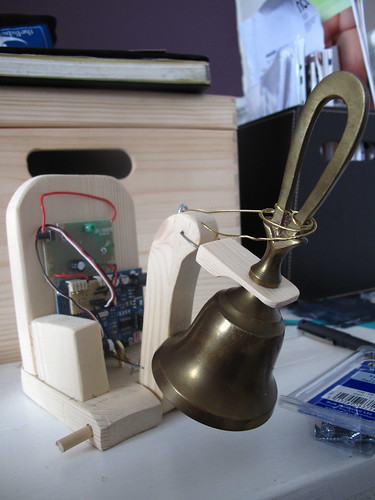
Next I got hold of a small brass bell from a music shop. Luckily the top unscrewed and would let me easily attached it to a piece of lego. So another prototype was created using the small brass bell:

This worked much better!
The bell is about 100g in weight, which isn't massive, but when it's flung around the lego prototype would tend to move too. Not so good when this will live on the kitchen window sill. So I'd need something sturdier for the finished version.
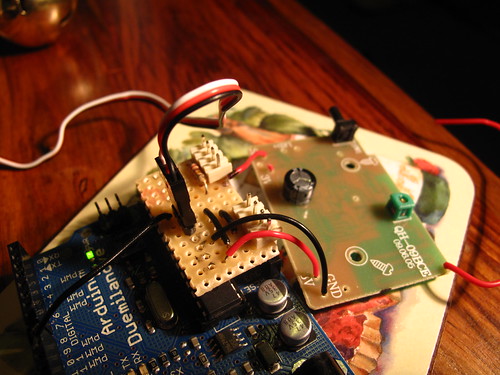
A little soldering
As well as trying out a better bell I also made the circuit for the bell and servo more permanent, by soldering everything up on a piece of stripboard. I also used a few headers, so most of the circuit would plug into the Arduino - like a rudimentary shield. The wire to the pin controlling the servo, was left to be plugged in separately. I hadn't soldered anything since school, so I ended up swearing quite a bit trying to do this. For me it was probably the trickiest part of the whole exercise, but it did work in the end. Just glad I had a multi-meter with a continuity mode to find the short-circuits - a knife worked well to clear up some of those.

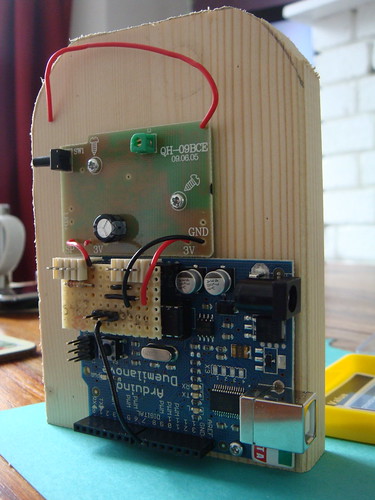
Woodwork
I next turned to my (t)rusty woodwork skills to create a sturdier version. First off some pieces of wood to mount the Arduino, doorbell circuit and servo:

Next came the base and first part of the bell moving arm:
Then I added the top piece of the arm as well as the picture wire to make the bell swing properly:
At this point everything worked as expected:
Tidying up
After the sawing and sanding was finished there was still some general tidying up to do.
Once I'd taped down the servo wire and antena wire with electrical tape I needed to deal with the movement of the whole piece when the arm swings out. First I got hold of some Sugru and made some small rubberised feet to prevent the bell sliding around:

The next task was to add a counter weight so the bell wouldn't tip over. For this I made two piles of fifteen pennies, which I wrapped in electrical tape and taped to the ledge on the reverse side from the Arduino:

Eventually these will be covered up and will probably actually make up part of the internal structure of the outer decoration. This should also mean they'll end up being attached better. For now though electrical tape has proved sufficient.
One final tweak involved inserting some small nylon washers either side of the arm:
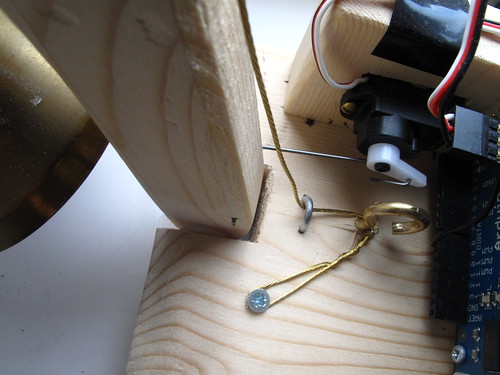
This was done to help make the movement of the arm more consistent and slightly smoother. Previously I was finding that the arm would shift position slightly, which sometimes caused problems for the servo.
Deployment
With the hardware finished I then set about actually getting it all up and running as our real doorbell. So imagine my horror when upon placing the doorbell on our kitchen window sill and connecting the power everything went haywire and the arm just constantly moved! After some tweaking of the code and kitchen-side debugging I realised that I really should make use of the Arduino's internal pullup resistors for the doorbell pin. Up until that point I had left it "floating". When powered by the USB this rarely drifted to zero, so I thought it was working fine. However on mains power it regularly dropped quite low, making the Arduino think the button had been pressed, triggering the servo. Configured the pullup resistor and tweaking the activation threshold (as it was now higher than zero) sorted out this problem perfectly:
Conclusion
So we now have a slightly Heath Robinson doorbell. It works better that our old one. There's also plenty of scope for making it do more too. In fact phase two will be mostly about connecting the doorbell to my Chumby to get it communicating with the local network.
Check out my doorbell git repository on github for the code, as well as a fritzing circuit file.